Sunday, October 29, 2017

A post for 2017

For the historical record (and just because I felt like writing), I'm revisiting this neglected blog and posting an update.  It has been over a year, after all!

Last year's fabric book challenge kind of fizzled out, except for a few exceptions.  So did the following one. Some of the reasons given were:  not really interested in the subject/theme, ran out of time, lack of commitment, couldn't get started, etc. So what do we do when there's low participation in our challenges?  Maybe the answer is to let each person decide what subject interests them and/or what techniques they'd like to learn.

That's the new Self-Directed Challenge where each member decides what she wants to work on.  Each chooses their own subject matter and some parameters that will challenge and push them creatively.  We'll share our projects at each monthly meeting to show our progress.

I've finished the first half of my Self-Directed Challenge, which was to make a piece for the Pathways exhibit at Memorial Union at Oregon State University in Sept-Oct.  The exhibit featured work by the Valley-South SAQA group I'm in.   

"The Illuminated Way"

detail
The background fabric was first deconstructed screenprinted and deemed ugly.  So I dyed it teal, then stamped it with one of Maureen's wooden tjaps (printing block).  A blonde sheet of silk fusion (a sort of silk paper I made from silk roving) was placed on top of the background, then channels of teal velvet were stitched over it.  A vertical trail of tiny squares of copper foiling were added, then the quilting.

My artist's statement was about being overwhelmed and getting lost by all the possibilities.  We observe, research, and sample many avenues, always searching for the one that lights up our soul.  "In art, as in life, I'm seeking that spark that illuminates the way forward for me, showing me that I'm on the right path."

Other work completed this year includes these two small  pieces inspired by English artist Angie Hughes, whose work I greatly admire.  They're on a velvet background and the techniques used include fabric painting, discharging through stencils, Angelina fibers, Textiva film, organza layers, and free-motion quilting.  One of the reasons I enjoy making these so much is because of the varied techniques used.  (The variety keeps me interested so I don't wander off and start something else!)

Three Candles (9x10")

Spring Blooms (7x9")
I'll show the results of my eco-dyeing explorations in my next post.  I've really enjoyed steaming eco-prints onto watercolor paper, and have also done more with onion skin dye, solar flower dyes, cochineal dye, and indigo.

A simmering pot of onion skins for dye.


Happy Halloween!

Tuesday, August 30, 2016

Summer Dyeing

What a long overdue post!  I was lucky enough to participate in two fabric dyeing retreats this month.  The first was with members of the Fiberexplorations group. It was hosted by Nancy at her beautiful ridgetop property in Gates, OR (a.k.a.Gateway to the Cascades), where we had a huge studio to play in.
Teresa, me, Nancy, Kathleen, and Lisa
Though we'd planned to do a variety of dyeing methods, everyone enjoyed ice-dyeing so much that we pretty much stuck with that.
These colorful kids' sand buckets and matching-sized
colanders from the dollar store worked best!
We strung two lengths of clothesline to hang our dyed fabrics on, which made a colorful statement against the backdrop of the darker woods.


Lisa stamped this fabric with Dawn dishwashing detergent,
which acted as a light resist when dyed.
 

Teresa's stunning results,  even as a first-time dyer!
After dinner on our first night, we took a walking tour of neighboring Mill City and watched the Santiam River pass under the town's bridge.  We had some other adventures that probably shouldn't be reported here.  It involved fire trucks (but no fire).
Mill City bridge
The happy dyers:  Kathleen, Lisa, Nancy, me, Teresa
 Thanks for hosting us, Nancy!  We can't wait to do it again next summer.

Sunday, May 29, 2016

Projects from May

Happy Memorial Day Weekend -- the unofficial start of summer!  This month, I've set up a challenge for myself to create smaller quilts (about 8x10" or 9x12") using only what's in my basket of fabric scraps and leftover pieces from previous projects.  Here's what I have so far:

"Purple House," 8x10"
 Yes, purple and green again (with a splash of orange).  Needs more work:
"Expectation" 8x10" (in-progress)
 Continuing with orange . . .
Untitled (& unfinished), will be about 10x12"
 Lots of orange scraps to use up, so why not?
"Hot!" (possible quilt background)
Something different . . . inspired by Jackie Cardy, who makes the most beautiful brooches in yummy colors you can't get unless, like her, you dye your own  silk velvet.  Someday I'll try that!  Below, the two pieces in the center are on black felt, while the two on the sides are on my handmade silk paper.
Stitching on velvet
Another project finished this month was the Barbados Bag (pattern by Pink Sand Beach).
 "Barbados Bag"
Today's venture:  I pulled out my ancient jars of Setacolor paint (still good!) and sun-printed some fabric.  The first two were slightly scrunched (the lighter areas were inside the folds and not exposed to the sun).  Leaves and flowers were placed on the 3rd piece and sun-printed.
Sunprints using Setacolor paints
The remaining two projects are journal quilts I made in February.  After making them, I decided I didn't want to commit to this as a monthly project.  The current challenge for the Fiberexplorations group is very loosely defined:  to create any type of artist's book for the purpose of exploring whatever technique(s) or subject(s) you choose.  A book of journal quilts (about 9x12") isn't what I want to do, though I'm not sure what is, except that I want something small enough to fit comfortably in one hand.

February Journal Quilt, 9x12"
"Leap Day" Journal Quilt, 9x12"
With the warmer weather, I'm excited to continue learning about and experimenting with natural dyes and eco-dyeing.  Next time, I'll include photos of the lichen dye I'm making, which has to steep for a few months before using.  I really want to try dyeing with eucalyptus leaves, but we don't have them here in Oregon.  Maybe I could trade a bag of staghorn lichen with someone in California who has eucalyptus leaves.  Know of anyone?


Saturday, April 30, 2016

This design stuff is hard!

There's obviously a huge gap of time where no posts have been made to this blog.  It's not that there's no new work to show from the group or me personally . . . I guess we'll call it what it is:  laziness!

For the past few evenings, I've been trying to work out a new design that looked fine in my sketchbook and my mind, but it's a struggle to work it out with pieces of fabric on the design board.

Here are a few iterations I've played with so far, and right off the bat you'll notice that I failed to compensate for the needed mirror-image effect when I cut out my gray-pieced triangles.  Here, I've just flipped them and used the wrong side while auditioning layouts:

Starting point.
 It had none of the wonkiness I had in mind!  Unpinned it all and started playing around:
What if I added some skinny inserts?

Another idea . . .
And another . . .
After rotating it 90 degrees counter-clockwise:
Possibilities?
I like the movement from the upper gray-pieced triangle (with curves) as it seems to take an abrupt right-angle turn south (via the horizontal gray section in the middle).  But who knows what will happen now?  It could evolve into something or get scrapped and added to my box of Orphan Pieced Units for a fantastic future project. 
For now, the weather has stabilized and it's warmed up to be a beautiful spring day -- too nice to stay inside!

Monday, November 30, 2015

Eco-dyeing with the fall harvest


It started when we harvested our Concord grapes and I saw all that beautiful purple juice.  My husband was trying his hand at making grape jam, but all I could see was another way to dye fabric, so I confiscated some of the skins and juice and set about experimenting.  My results, on cotton (left) and silk (right:

Dyed with grape skins and juice

With this new passion ignited, I started looking for possibilities.  Aha!  Black walnuts from my son's backyard.  When the outer hull (yellowish-green) begins to turn black and peel away, what's left is an inky black, fibrous substance surrounding the nutshell.  It really stains!  I filled a bucket with them, added water, stirred, and made "walnut hull stew" for fabric dyeing!

Walnut-hull stew
I tightly bunched up a piece of cotton (pre-mordanted with alum), bundled it tightly, and tossed it into the "stew" for 24 hours.
Cotton, bundled for dyeing

Walnut-hull dyed cotton
Cotton sateen, walnut-hull dyed

Because our summer seemingly lasted forever, I still had flowers blooming into late October, just as our trees were turning color and beginning to fall. My next experiments took me back to my childhood and my favorite library book, Mud Pies and Other Recipes by Marjorie Winslow.*  I walked through my yard, choosing flowers:

Late-season flower harvest
 I carefully picked apart the flower petals and leaves, then arranged them on lengths of alum-mordanted cotton  and a piece of silk (no mordant) . . .
Flower petals and leaves  on cotton
 Then tightly rolled each piece around a stick, secured with twine (also called "eco-bundling"):
Final step:  placed them in a bamboo steam basket inside a very large pot, covered, and steamed for 1 hour.

Nothing happened.  I missed a step!  I forgot to mist them with vinegar water, so I did, and got them pretty wet, and steamed them for another hour.  Here's one of the pieces after it air-dried.
But after I rinsed it in lukewarm water, most of the color faded and not much was left, except for the lines made by the twine wrapping:


Finally, I moved on to ice-flower dyeing, a method developed by India Flint in her book Eco-Colour.  I used flower petals I'd collected during the summer, then placed in plastic bags and froze.  I choose some frozen fuschia-colored peony petals, placed them in a Mason jar, and added lukewarm water (and vinegar, to promote the red color).  According to India,
"the temperature shock of immersion assisted in the rapid release of colour.  
Freezing plant material has the added benefit of breaking up the 
structure of the plant, as the moisture contained within the 
cells expands while becoming solid." (p. 138)

Unfortunately, my results were less-than stellar:
Cotton, ice-flower dyed (with peony petals)

Cheesecloth, ice-flower dyed (with peony petals).  The pattern was created
by the way I folded the fabric before immersion.
Where did the pretty color go?   Looks like I'll need more practice!

Lessons learned:  Patience is a virtue.  There are no guarantees in life.  Keep playing and experimenting.  There's always more to learn.

* The magic of Mud Pies and Other Recipes
:  Though I didn't really play with dolls (except for Barbies), there was something about foraging in my own backyard that totally absorbed me.   At my pleading, my mom bought me a stack of 3x5" index cards, and I hand-copied every recipe in that book for my own collection.  (Oh, how I wish I still had that collection!)  I can still recall the magical feeling evoked by Erik Blegvad's illustrations; they take me back to the smell and feel of bright, hazy Mid-Atlantic mornings.

From the book's foreword:

This is a cookbook for dolls. It is written for kind climates and summertime.  

It is an outdoor cookbook, because dolls dote on mud, when properly prepared.  They love the crunch of pine needles and the sweet feel of seaweed on the tongue.  The market place, then, will be a forest or sand dune or your own backyard . . .

Friday, October 9, 2015

A new improv quilt takes form

Improv is . . . setting limits to expand horizons.  
-- Sherri Lynn Wood, The Improv Handbook
 
My Modern Improv class at Greenbaum's Quilted Forest has evolved from last spring and summer's class, Quilt Improv.  As much as I loved the sample from this past June's class, it didn't feel like true improvisational quiltmaking to me and probably should've been called Intro to Improv.  It was based on 12 block styles that could be mixed and matched to make an improv-style quilt.

"Improv 2-15," from my previous Quilt Improv class
Modern Improv, the newly revamped class, is based on The Improv Handbook for Modern Quilters: A Guide to Creating, Quilting & Living Courageously by Sherri Lynn Wood.  The author doesn't use templates or rulers, and prefers cutting with scissors rather than rotary cutters! (I still use mine, as I'm faster and more accurate when using a rotary cutter.)
"Evaluate and identify a personal lexicon
of improv patchwork techniques and shapes,
then juxtapose two or more of them into a
single composition."
-- Sherri Lynn Wood
Sherri's statement above pretty much describes the way I work.  The shape I chose to focus on for my new sample is the curve, and I'm using wedge-shaped pieces and layered curves to create my design.  I've been more indecisive while making this project than I usually am.

Like most improv projects, I don't tend to sketch a design in advance or even think much about it.  I just cut fabric, sew pieces together, slash them apart, and add another piece.  I make lots of these units, put them on the design wall, and try to arrange them into something pleasing.
Too much yellow
Trojan warrior's helmet?
Audition # . . . 47??

Add more light blue (spaces for eye to rest)
The author writes,
Improv is experimenting and getting lost ... eventually you are sure to find your way back, having discovered something new.
I was still a bit off-track (not lost!).  I decided against that light blue and reduced the amount of it at the bottom right.  After all, the solid dark blue already provides a break for the eye:

Unsure about the blue batik at center
of curve, and the shape is still a Trojan warrior's helmet!

Chopped the "helmet" in half, rotated pieces, added light blue AGAIN!
Auditioning continues to continue and will continue to do so until it's done. Soon, I hope!

Wednesday, September 2, 2015

Workshop with Sidnee Snell

I first learned of Portland textile artist Sidnee Snell through an episode of OPB's Oregon Art Beat, and became a huge fan of her art.  When I read that Rogue Modern Quilt Guild in Ashland was offering a one-day class taught by Sidnee, I signed up right away.

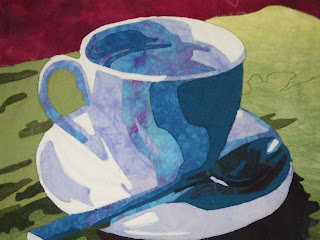
Sidnee's technique, which she calls foundation applique, is based on a photograph, usually digitally manipulated, then broken down into a sort of paint-by-numbers pattern, but in this case, it's more like applique-by-numbers. She gave us each a still-life photo featuring a cup and saucer with a spoon, and the corresponding pattern enlarged to about 16" x 20". We each began constructing our own version of  the still life, using our own fabrics along with Sidnee's enormous pile of hand-dyed fabrics, which she brought specifically for us to use.  (I've never met a more generous instructor!)

Here's the photo we worked from:

Photo courtesy of Sidnee Snell
 And my version of her image:
Cup & saucer, not yet quilted

In my opinion, one of the most appealing characteristics of Sidnee's work is her quilting, and the magical way she adds texture and movement to her art.  (If you haven't clicked on the links above to see her work, please go back and do so.  It's a real treat!)  I can only hope to come close to emulating what she does.

But I have to put this project aside for now and finish up some other things.  I'll update this post with a photo of the quilted and finished cup & saucer when it's done.  I was really fortunate to get to take this class, as I later learned that Sidnee doesn't usually teach.  Lucky for me to catch her after this guild was able to convince her to come to Ashland and share her techniques.  And to make  the weekend even better, we stayed with long-time friends Louise (Louie) and Rob in Ashland, whom we don't see often enough.