Friday, May 13, 2011

Check out this book!

I miss my camera!  I hadn't realized how much I depend on my little digital camera until it stopped working about 3 weeks ago.  I use it to take photos of work in progress, things that inspire me, and for images to post on this blog.  Yesterday I took a break from work to pull some weeds, and within the space of 5 minutes had found three snakes!  My instinct was to run for the camera, but then I remembered . . .

The need to add some color to this page determined the topic.  Today's mail brought a copy of  the book Twelve by Twelve: The International Art Quilt Challenge:

It's rich with inspiration!  I'd already seen most of the quilts on the group's website and on individual members' blogs, but the book offers so much more (www.Twelveby12.org).  Each chapter highlights one of the groups' challenge themes and is narrated by one of the members.

Twelve by Twelve is an international online art quilt group.  Every two months, its 12 members responded to a new, one-word challenge theme by making a 12" x 12" quilt, then posting it online on "reveal day."  Often, the challenge "word" had different meanings to different members.  In addition, there were no other limits or restrictions included in the challenges, making the realm of possibilities even more fascinating.

This group isn't finished working together.  According to their website, they're in the middle of another challenge, with a reveal date of  June 1, 2011.

I'm glad this book arrived on a Friday.  I have all weekend to devour it.  Oh, wait! I meant to say that I'll be sewing most of the weekend, but will be able to stay up later than usual to dive into the book .

Wednesday, April 20, 2011

Two classes with Barbara Shapel

 Gorgeous, luscious, yummy, free-motion quilting
by Barbara Shapel!!!!


Barbara Shapel's free-motion quilting

Lucky me! I got to take two workshops with Barbara Shapel (from Washougal, WA) at the Stitchin' Post in Sisters, OR on April 14 and 15.  The first day began with Barbara's discussion about which threads to use with which needles, thread tension, ergonomics, and other info necessary for successful free-motion quilting.

On day two, she also covered the "needle-thread-tension-sewing speed" topic before demonstrating her specialty, threadpainting.  If you're not familiar with the term, imagine a scene entirely "painted" with thread, and that's what Barbara creates with her sewing machine.  Flowing lines and layers of thread, laid one upon the next, magically become a graceful heron,

Barbara Shapel's threadpainted heron.

or an owl in flight with shimmering feathers:
Barbara Shapel's threadpainted owl
Her threadpainting is just as beautiful on the back as it is on the front:
Barbara's owl from the back


This gifted teacher spent several years of intense trial-and-error teaching herself to free-motion quilt with her home sewing machine.  Before there were books on the subject and other teachers showing the way, Barbara worked on her own, experimenting with different threads, needles, batting, thread tension, stitch setting and speed, hand placement, hoops, gloves, etc.  Over that period, she developed a systematic method of FMQ'ing that's practically fail-proof, and which has won her many quilting awards and made her a much-sought-after teacher.


If you ever have the opportunity to take one of Barbara's classes, GO FOR IT! (and fast; as they'll be sure to fill up quickly!)

Tuesday, April 12, 2011

Progress on our challenge quilts

Torrie's "Small Wonders" piece
At our April meeting, Torrie brought her finished piece for the "Small Wonders" quilt challenge, sponsored by the Stitchin' Post in Sisters, OR. For this challenge, partipants create and donate a small quilt (between 18" and 24" in size) for a fundraiser benefiting nonprofit organizations in Sisters. The quilts are displayed in the Sisters Library during the month of May, where visitors can vote for their favorites. Prizes totaling $500 will be awarded. If you can't get to Sisters to see them in May, the quilts will also be displayed (and sold!) during the Sisters Quilt Show on Sat., July 9.

I love the cheerful, high energy feel to this little quilt, which incorporates pieces of all the fabric swatches from our in-progress Fabric Swatch Challenge. But Torrie's not finished working with this color palette yet; she still plans to make a larger quilt for that challenge! It will be a different design (and larger -- at least 36" on each side), using the rest of her fabric swatches from our exchange, plus fabrics from her own stash.

I've made some headway on my own piece for our Fabric Swatch Challenge. I first sketched some design ideas in my design journal, chose the best parts, then drew the layout (an abstract landscape) on large tracing paper, choosing a 36" wide x 48" long format. Yikes!!! That's HUGE for me; I usually work much smaller, like 9" x 12" journal quilt size. But it's a good challenge for me -- and that's what a challenge is all about, isn't it? Pushing yourself to try things a different way, testing yourself, getting out of your comfort zone, and seeing what you're capable of.

The next step was to gather the pieces from our fabric swatch exchange and audition others that worked well with them. The fabrics were folded to fit together in their assigned areas of the traced layout, then photographed:


The "draft" layout of my design.
Since taking that photo, I've stitched together 2 rows/sections: the blues and greens and the yellow-oranges.

I strayed from my original plan when placing fabrics at the bottom of the design; I've decided to change it back to my original idea. The dark brown vertical piece has also been nixed, along with several other changes.

Again, that's what I love about art quilts -- that new ideas can be considered and decisions made all the way through the process; nothing's set in stone. That's freedom!

Final note: I really want to be the buyer/owner of Torrie's "Small Wonders" quilt, but I'm afraid I'll have some stiff competition. If anyone out there has some influence in helping me make this acquisition, I'd be most grateful!

Wednesday, March 30, 2011

Winter/Spring


I was struck this weekend by the differences in Oregon's micro-climates.  Here in the Willamette Valley, it's been "spring" for a few weeks:
Daffodils:  evidence of spring
Yet, 2 hours away in Camp Sherman, nestled on the western side of the Cascades, it's still winter.  This past weekend brought snow, rain, snow, snow, rain, and snow.  In the late afternoon, I glimpsed movement in the yard and caught these trespassers napping:


One, two deer . . .

Three, four, five, six . . .


I enjoyed the rare company of my son the last weekend of his college spring break.  But when he left on Sunday, I stayed at the cabin, sick with a stomach flu.   I spent many hours watching the weather changes, listening to the rain drumming on the metal roof, then experiencing the total silence of a winter snowfall in the woods.
Later in the afternoon,  I closed the curtains and took several deep winter naps, catching up on lost hours of sleep.  In between, I watched a film about Andy Goldsworthy and his art . . . twig sculptures bound together with only thorns, rocks balanced one upon another, ice shards molded into graceful curves, autumn leaves trailing in a colorful display over river rocks.  And hearing him talk about his art and what it means to him, well, all I can say is that it filled me with inspiration.

A must-see!!!


Wednesday, March 23, 2011

More Surface Design!

Discharging and replacing color with Decolourant Plus, using lime, red, and a bit of purple in the center.

I'm having so much fun NOT sewing!  What I mean is . . . well, I intend to sew very soon, but first I had to make some interesting fabric.  (Not enough in my stash???)

I was playing with a new product from the Stitchin' Post in Sisters, OR that both DISCHARGES and ADDS color  all at once!  It's called Decolourant Plus "Color Replacer for Fabric and Papers."  It's much safer than using bleach, doesn't degrade your fabric, and comes in a 4-pack.  My set included 3 bottles of discharge-and-color:  lime, red, and purple. 
  
Again, on black fabric

 The 4th bottle contained no color; it was just the discharging ingredient.   I added some turquoise paint to it and stamped these:

Plain DeColourant with turquoise paint added
On my own hand-dyed gray and turquoise fabric

The last piece was a combo - plain with a tiny bit of lime (looks kind of yellow)  in the upper left, and simply plain discharge in the upper right (using a self-carved stamp in both those areas):
A bit of overprinting
All the above were commercial stamps, except the hand-carved stamp shown above.


The next challenge is to cut the stamped images apart and arrange in a wall quilt.  Simmer, ideas, simmer!

Friday, March 11, 2011

Erika sparkles at "Art at Zena" reception

 A smiling Erika Close, next to one of her "Art at Zena"quilts
As one of the artists featured at the Art at Zena exhibit, Erika looked pretty in a wearable art jacket she designed and made herself.   Tonight's artists' reception was well attended, with art lovers and supporters drifting through the exhibit of mixed media pieces, handmade wooden tables (made from wood found at the Zena property), stained glass, metal, and of course, fiber art.

Erika's three 16" x 10" quilted pieces were hung side-by-side, next to several mixed-media pieces.  I overheard several comments on "the quilted art," all of them positive and admiring.  One woman asked me if I knew who made the three pieces, and when I pointed out Erika, the woman exclaimed "She made all three of those?"  Obviously, she was very impressed.

Fire in the Field by Erika Close


Farmhouse Figs by Erika Close


Ferns in the Forest by Erika Close

Erika's family was by her side during most of the evening, including husband Justin, their son and daughter, and her mother-in-law  Maya (also a Fiberexplorations member!). 

In her Artist's Statement for this exhibit, Erika spoke about her experience:
The "Art at Zena" project sponsored by Willamette University has been a wonderful journey through that creative process.  Just being on the property and around the people that have had such a wonderful vision of what it could be has been so inspiring.  Their ideas to conserve and bring back the farm and surrounding property to be a sustainable hands-on place of learning is going to be an inspiration for many generations to come.  The day I spent there with the other artists was a very thought provoking and insightful afternoon.

If you missed the artists' reception, the exhibit continues through April 30, 2011 at Salem's Bush Barn Art Center.

Tuesday, March 8, 2011

New exhibit includes one of our own!


The Fiberexplorations group is proud to announce that one of its members, Erika Close, is a participating artist in a new gallery exhibit, Art at Zena, at the Bush Barn Art Center in Salem, OR.  We've been privileged to see Erika's quilted triptych evolve over the past several months, and now the public has the same opportunity.

The exhibit opens this Fri., March 11, with an artists' reception from 5:30 -7:30pm., and is on display until April 30.  Mark your calendar!
As part of Willamette University’s mis­sion to uti­lize their Zena For­est prop­erty for eco­log­i­cal and edu­ca­tional pur­poses, the Cen­ter for Sus­tain­able Com­mu­ni­ties invited a group of artists, writ­ers, pho­tog­ra­phers, and film­mak­ers to con­vene at Zena for one day in July 2010 and then cre­ate indi­vid­ual and/or group works based upon their expe­ri­ences. These works will be exhib­ited in the Camas Gallery as part of the Envi­ron­men­tal Pro­tec­tion Agency’s National Sus­tain­abil­ity Month.  --  Salem Art Association news release
Congratulations, Erika!

For more information, contact Salem Art Association:  www.salemart.org.

Sunday, March 6, 2011

More surface design play

Lately, I'm wondering if I'm still a quilter.  Since my Viking desperately needs a tune-up, I'm avoiding any freemotion quilting and spending most of my creative time in surface design.  And I'm loving it!

Here are some of the results from last week's play.  My favorite:


My golden batik.  Waxed designs were drawn with an electric tjanting.


Another evening was spent screenprinting.  I tried a deconstructed screenprinting technique from Susie Monday's Mixed-Media Textile Art CD from Cloth, Paper, Scissors/Interweave Press.  I drew some simple designs on my funky homemade screen using Caran d'Ache crayons, as shown below.  (Note: the rust-colored stain on the screen didn't print, thankfully!  The frame was made from recycled sheer curtain fabric in an old wooden picture frame, tightly wrapped and sealed with duct tape.)

Screen ready to print.

The prints were made using Golden's GAC 9000 textile medium, which you can see on the printed fabric, outlining the dimensions of the screen:


Experiments with deconstructed screenprinting.
Last of all, I used another clean screen and pulled these leaf prints from a hand-cut stencil attached to the back of the screenprinting frame.  The stencil material?  Half of a cut-apart clear poly page protector. (Quick, cheap, available!)

Screenprints of leaf design.
Now, what to do with the prints???  My sewing machine wants to know.


Saturday, February 19, 2011

Fabric Swatches Exchanged

At Monday night's Fiberexplorations' meeting, we exchanged our 9" x 9" swatches of "transformed" fabric for the next challenge.  Following the guidelines from the new Cloth, Paper, Scissors' Fabric Swatch Exchange, we used a variety of techniques to transform our fabric, including fabric painting, dyeing, stamping, gelatin monoprinting, overdyeing, stitching, and katazome (a Japanese form of printing with a stencil and rice paste resist).

Our palette and samples


The poster (by Kathy Deggendorfer) for the 2011 Sisters Outdoor Quilt Show served as our color palette.  For the challenge, each person will make an art quilt using at least some of each fabric swatch, plus any additional fabrics of their choice.  We plan to enter these quilts at the Sisters' Quilt Show this summer.  (It's always the 2nd Sat. in July.)  The only other rule is one from the quilt show itself:  each side must be at least 36" inches in length.

A beautiful set of fabrics to work with!

The second photo shows some of the techniques used.  On the right, from top to bottom:  Lisa's stitched fabric swatch, Joan's blue & white katazome, and Maureen's green batik dribbled w/ blue and dotted w/yellow.

The swatches are amazing, especially since this was the first experience with fabric painting for many members.  And that's what this group's all about:  pushing ourselves (gently) to step outside the box and explore, experiment, and enjoy the journey!

Wednesday, February 16, 2011

Collage from ONE Fundraiser

"One Point Five" by Virginia Spiegel

I'm now the proud owner of "One Point Five," a fiber art collage by Virginia Spiegel, the creator of the event.  It's exciting to know that I'll soon have one of these collages on my wall, but even more thrilling that it's one of Virginia's!

Despite sleeping later than I intended, I was still able to snag one of the 100 fiber art collages from today's online fundraiser for the American Cancer Society.  The ONE Fundraiser, which I wrote about in yesterday's post, has now SURPASSED its goal of raising $8,000 in one day!  With 15 minutes left in the event (as of this writing), they're up to $8,398 in donations.

What a great event!

Monday, February 14, 2011

Congratulations, Lisa!

-- Last Minute Announcement --

Quilting Arts' 2012 Calendar Contest winners were just announced today, and our very own Lisa Encabo was one of them!  Her pet portrait, "Cutie Says Feed Me, Throw My Ball!," will be viewed by thousands of admirers next year when Cutie's little face gazes up from one calendar month.  (Which one, we don't yet know!)

To see a list of winners:
http://www.quiltingdaily.com/blogs/pokey/archive/2011/02/13/announcing-the-2012-quilting-arts-calendar-artists.aspx

One Cause -- The Fight Against Cancer


Virginia Spiegel's done it again!  In the past, she's collected $205,000 for the American Cancer Society through her nonprofit Fiberart for a Cause.  Her new venture (ONE cause) seeks to raise $8,000 in ONE day for ACS, through the sale of ONE hundred collages created and donated by some incredible art quilters/fiber artists.  

http://www.virginiaspiegel.com/ONEFundraiserPreview.html

You can help the cause and, at the same time, become the proud owner of one of these art collages, so don't miss this ONE day event . . . which is just two days from now!  Here are the details:

One Cause - The Fight Against Cancer
One Wednesday - February 16, 2011

One Hundred Collages - Created by an all-star team of artists:


Natalya Aikens - Interview
Pamela Allen
- Interview
Laura Ann Beehler -
Interview
Liz Berg
Pokey Bolton -
Interview
Laura Cater-Woods -
Interview
Jette Clover -
Interview
Jane Davila
Jane Dunnewold -
Interview
Jamie Fingal -
Interview
Gloria Hansen
Leslie Tucker Jenison - Interview
Lyric Kinard -
Interview
Jeanelle McCall -
Interview
Linda Teddlie Minton -
Interview
Karen Stiehl Osborn -
Interview
BJ Parady -
Interview
Judy Coates Perez -
Interview
Wen Redmond -
Interview
Cynthia St. Charles
Virginia A. Spiegel


Our goal - Raise $8,000 in one day to add to the $205,000 already donated to 
the American Cancer Society through Fiberart For A Cause.


Written in Stone 3 by Jette Clover


On Wednesday, February 16, ONE hundred collages will be offered with a 

minimum donation for each collage of:

$160 for two hours (10 a.m. - Noon CST)
$80 for two hours (Noon - 2:00 p.m. CST)
$40 for two hours (2:00 - 4:00 p.m. CST)

For details, see Virginia's blog post for Feb. 13th  Ready to roll with ONE on
Wednesday?  Tips and Techniques  for previewing the art collages on Tues., 
Feb. 15th, and how to make your donation/choose your collage on Wed., Feb. 16th:

http://www.virginiaspiegel.com/blog/
       

Sunday, February 6, 2011

Glitz and Glitter

Awesome Angelina Sampler, in progress 


 This is one of the new classes I'll be teaching at Greenbaum's Quilted Forest this spring/summer.  I wanted to design something simple to show some of the many ways to use Angelina fibers and films. 

It's been fun to play with, moving pieces around, auditioning different 3" x 3" background patches for the nine squares, fusing different combinations of colored fibers, and generally keeping an open mind during the design process.  That's the joyful part for me -- being open to all possibilities until the very end, approaching the project with a spirit of playfulness.   I may still move some of the elements around . . .  lots of extra little circles from fused Angelina have been cut and they might be sprinkled throughout the piece.  We'll see!

Detail:  dragonfly square
Some stitching is still needed in places, such as detail of the dragonfly wings.  This project is nearing completion, and then it's on to finishing my other new class samples!

Saturday, January 22, 2011

Congrats to Lisa and Deb!

Yesterday brought exciting news to two members of Fiberexplorations, Lisa and Deb.  They entered the 2012 Quilting Arts Calendar Contest, whose theme was Are You Feeling Pet-ty?  (We used the same theme and guidelines for our fall challenge, AKA "the pet challenge.")

The news:  Both Lisa's and Deb's "pet portraits" were chosen as finalists in the contest!  Way to go!

What are the odds that two people from our small group of 10 would both make it this far?  There's some real talent in this group, and if I could remember to take my camera to the meetings, you'd see evidence of that talent right here!   Deb and Lisa now have to mail in their actual 12" x 12" quilts, and the 13 winning quilts for the calendar will be announced on February 11th.

Until then, though, I have only photos of my own projects to share. 

Soon, I promise, you'll see more of a variety here.  In fact, my camera will record our first "play day" in early February, where we'll experiment with fabric painting, stamping, stenciling, screenprinting, etc., all in preparation for our next challenge.  More details on that later!

Wednesday, January 19, 2011

What I'm working on

Machine needlefelted, hand beading in progress

 
Machine needlefelting; what next???


I think I'm drawn to working with these two pieces (they're at least 2 yrs old) because they're so colorful, and our winter in Oregon has been so dark & gloomy.  (Even more than usual!)

The first two weeks of January brought over two feet of beautiful, pristine snow to our cabin at Camp Sherman, as well as temps near zero.  While this photo shows sunny skies along with the snow, here in the Willamette Valley, the sun was blocked by layers and layers of clouds.
Our cabin from the back.
But my daffodils are up about 3", so spring is on its way!

Friday, January 7, 2011

F O C U S

FOCUS . . . Focus . . . focus

That's my Word of the Year.  (Forget that it was one of my TWO "Words of the Year"  last year, along with FINISH.  2011 is a new year.  A fresh start.  A new opportunity.)

Within the first week of January, and I finished a UFO:


"Love Note"
 Hmmm . . . maybe I should still include FINISH as a Word of the Year!

["Love Note" was from a class taught by the wonderful Beryl Taylor at (Portland's) Art & Soul Retreat 2008]

Thursday, December 16, 2010

Nuno-Felting at OFFF

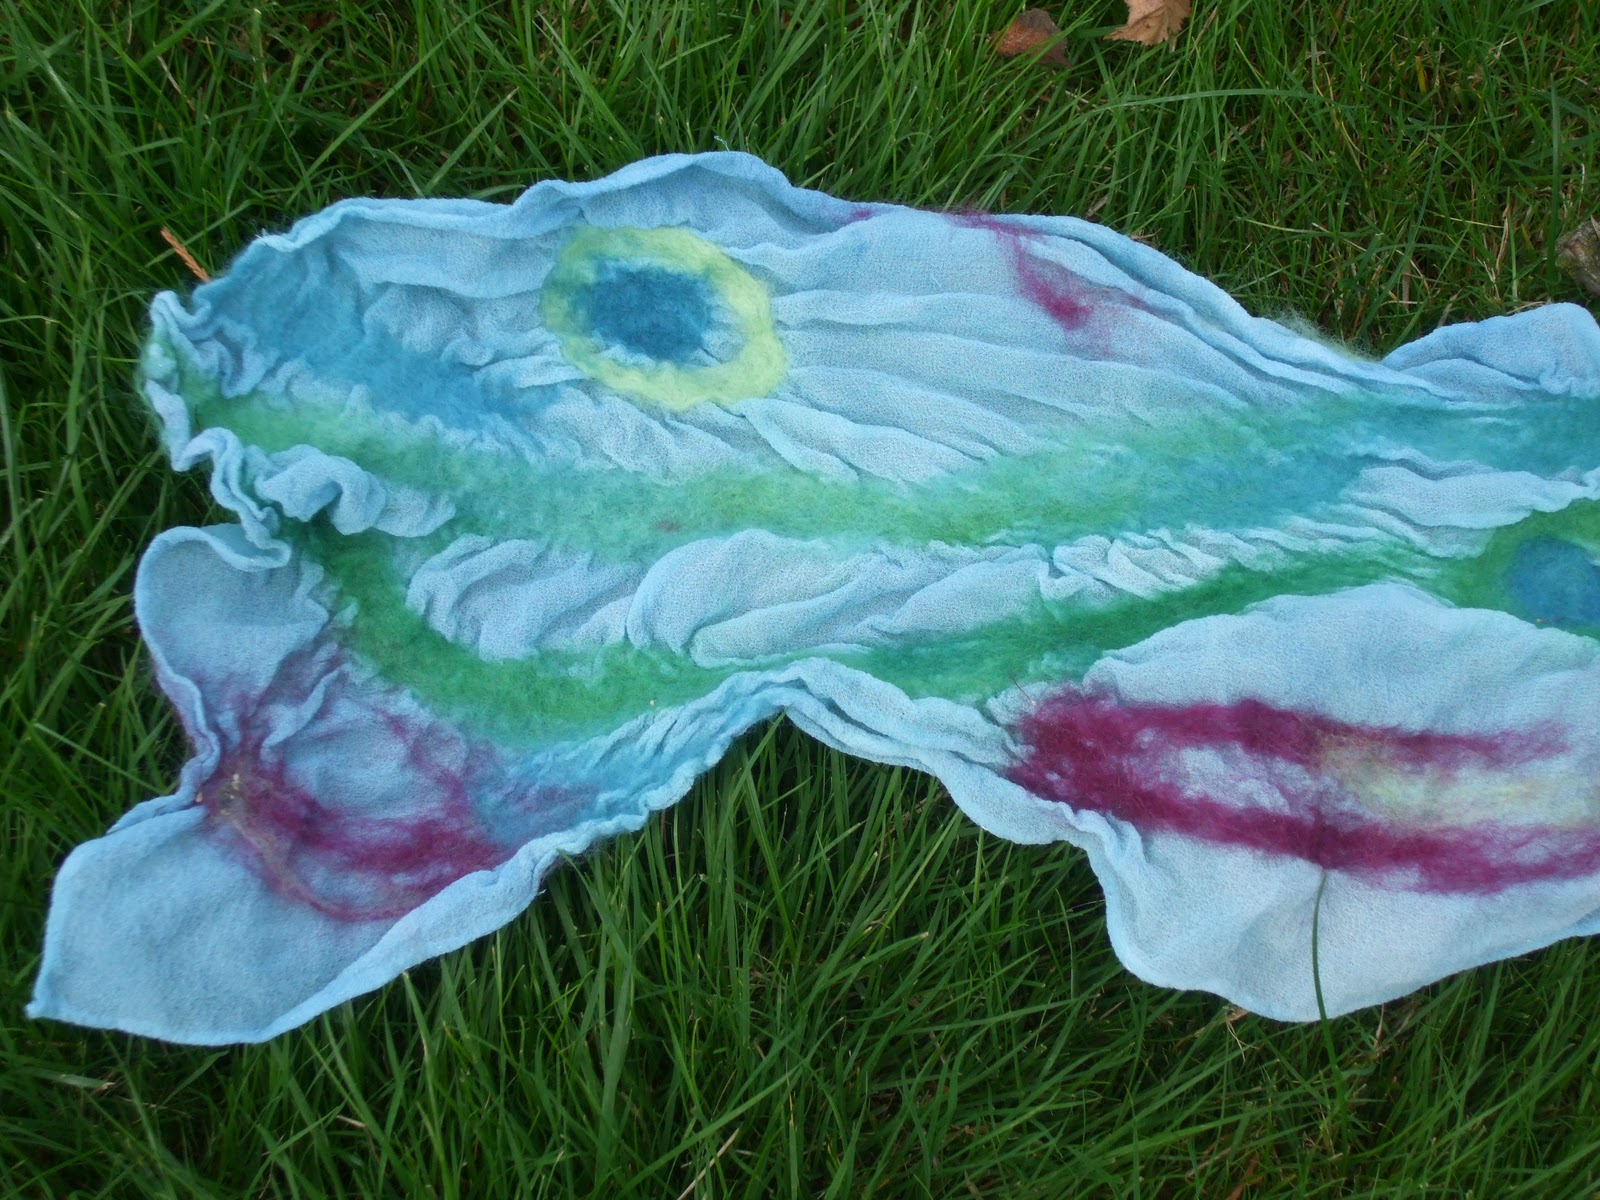
Nuno-felted scarf
For the past few years (the last weekend of Sept.), I've attended OFFF (Oregon Flock & Fiber Festival) with my friend Dean, who's a weaver.   In the past, I've purchased huge bags of dyed wool rovings, which gives me a great selection for machine needlefelting with my Embellisher.

I still did some shopping at this year's OFFF, but the big highlight was the nuno-felting class I took with Carin Engen, a wonderful fiber artist from northern Cal.  Nuno-felting is still a relatively new technique, where wool fibers are felted onto a silk base (or chiffon, gauze, scrim, or other light, open weave fabric), resulting in a beautiful puckered texture (see below).
  
Back of scarf folded over the front.
Unlike traditional felting, the entire base fabric is not covered.  Instead, the roving is carefully placed on the silk base to create a design, both from the colorful wool itself and the puckers that will result.
  
The beautiful puckers and gathers on one edge of the scarf.
A big sigh . . . now that I've learned this new felting technique, how will I find the time to fit it in with all the other fiber and mixed-media arts I love to do?

Wednesday, December 1, 2010

Going back to October . . .

Gelatin Monoprinting


I was the "presenter" at the October meeting of my mixed media group in Portland. [Each month, a member "presents" (teaches/shares) the workshop, which lasts about 4-6 hours.]  My topic was gelatin monoprinting.

The night before the meeting, each person made a gelatin printing plate, made from plain gelatin and water.  I doubled my batch, using two boxes of Knox plain gelatin (4 envelopes each) and 2 cups of hot water.  After refrigerating overnight, I had a nice thick rectangle of gelatin, about 9" x 11".

Some people leave their gelatin plate in its pan, but I take mine out for printing.  It begins to develop cracks and other interesting lines and marks without the confines of the pan holding it together.

The next step is to paint on the gelatin, then use strips of newspaper to create a design.  The paper strips act as a resist, so the areas they cover won't be printed.  I was thinking about one of our family's favorite children's books called "Barn Dance," and I painted a low, full moon illuminating a grassy orchard.  Here's my first print on watercolor paper:


Note the stick-straight lines in the trees, made by using torn strips of newspaper.

[Click on any image to choose another size to view.]

Before pulling any more prints, I misted the gelatin plate with water and wiped off the remaining paint with a paper towel.  I repainted the scene, but drew the trees with my fingers this time (instead of using strips of paper), removing paint like this:


and here were the resulting prints:

First print on white PFD (prepared for dyeing) fabric

2nd print made from same gelatin plate, after adding more paint to that still remaining on the gelatin.                                 
(I love Jacquard's Lumiere paints!  That's what I used to get the luminosity in the blues and  greens.)
  
  By now, the gelatin plate was getting these interesting cracks and crevices, which give texture and character to the prints I was making.  The plate would last a lot longer, but was taking up too much refrigerator space.  So I went all out, covering the plate with paint as I composed this desert-in-spring scene:
 
 Note the large crack about 1/3 from left side, and the pockmarks on the green foreground.


While it's not my favorite print, this ones does have some interesting sections.  I like the brush marks in the blue sky, and those in the lower left corner.  The colorful dots will become flowers.  Threadsketching and quilting might bring it to life!
 
 This was my third experience with gelatin monoprinting, and the best so far.  I learned much more this time; it's a fun & exciting process and is very forgiving.   I can't wait to try it again!  But first, I want to quilt these pieces, which I'll show when they're done.

Thursday, July 1, 2010

Post HOW OFTEN???

Wow, so much for good intentions when I last wrote that I'd post every Sunday!  Looking back, I think I can honestly blame it on the cool, wet spring we had in the northwest.  I think we even broke a record by June 4th by surpassing the normal rainfall totals for the entire month in the first 3-4 days.  I can't be sure, though, because I was on Maui.  

What can I say?  I needed sunshine!  My friend, Terry, invited me for 10 days in paradise, and not being one to disappoint, I decided to go and keep her company.  She lives upcountry, which means not down along the crowded coastline, but higher up the flank of Mt. Haleakala, an extinct volcano.  At that higher elevation, one is treated to panoramic views and cooler temperatures, courtesy of the trade winds.  And paradise it was -- beautiful flowers, ferns, palm trees, a spacious house, open to the breezes, a private pool, and to top it off, Terry gave me the master suite!

Sunday, February 14, 2010

Valentine's Day -- Sunday -- Must be "Blog Day!"

Rather than being so erratic about posting to this blog, I'm going to follow my friend Karen Bates' example     ( www.karenworks.blogspot.com ) and (try to) post every Sun.  Most aspects of my life feel erratic these days; maybe I should have written New Year's Resolutions!  But since that date has come and gone, I decided that my REAL new year begins on my birthday, which just happens to be tomorrow, Feb. 15th.  

Today I will set some goals for my year, and on top of those, I chose two words as my theme for the year:  "Focus" and "Finish."  I have problems in both of those areas and really want to work on them.  As I write this, I had a vision of thin, sheer organza (representing my themes, "Focus" and "Finish") floating down over my "block" of goals!  That's interesting . . . I may have to make make that in fabric -- a strong visual statement of my goals and intentions for the year that I could see throughout each day.

Back to TODAY.  Lots to get done:  working on the shop samples for the two new classes I'll be teaching at Greenbaum's Quilted Forest this spring/summer:


 "Seaside Village" (by Dyed and Gone to Heaven)

I loved this quilt as soon as I saw the pattern because it feels so summery.  I have piles of fabrics pulled together and will begin cutting and piecing this afternoon.


  My other new class has no pattern; it came straight from my head and a desire to share many of the surface design techniques I've learned (many were self-taught).  It will be called "Surface Design Sampler" and will meet for 3 hours once a month, for 3 months.  I'll cover fabric painting, stamping, stenciling, foiling, rusting, etc. for art quilt backgrounds, plus monoprinting, and painting on unusual surfaces (Color Catchers, batting, etc.).  We'll learn to use new products -- Texture Magic, TAP (Transfer Artist Paper), and Lutradur; discover 3 techniques for image transfers,


and create lacy effects with painted fusible web, Angelina fibers, and organza (right).   We'll do one mini-project at each class, then put samples of all our new techniques in a handmade canvas book.  Wow!  I'm EXTREMELY excited about this new class!  (can't ya tell??)


And to finish up my multi-post series on Fabric Marbling . . .  I continued to practice, and here are more results (below) , made with a fresh batch of fabric treated with alum -- much better at retaining their color!


And a few made by my friend, Kristen.  These two were done earlier, with the older alum-treated fabric from last summer, which is why they're so washed-out):

(aqua + black, left)


 (purple + white + black, right)


When the Fiberexplorations group met last Mon., Feb. 8,  we had 3 pans set up containing methocel base, so most members got to experiment for themselves (with mixed results).  Aren't there always challenges?  This time, the droplets of dye kept dropping to the bottom of the pans, rather than floating on the surface as they're supposed to.  Nevertheless, we got some good prints, but sorry . . . I didn't think to photograph them!  Once everyone left for the night, I continued experimenting and got some muddy prints (from overmixing the floating drops of dye), but I did get this one I really liked.  Because of the large pan, it took more than 1 precut piece of fabric:


That wraps it up for this Sunday.   
          
      HAPPY VALENTINE'S DAY! 

Be sure to spread the love today; the world needs it.