Tuesday, March 13, 2012

Our new challenge

Our group enjoyed last year's Fabric Swatch Exchange Challenge so much that we're doing it again this year.  Our finished quilts are already listed as a special exhibit at this summer's Sisters Outdoor Quilt Show (SOSQ) on Sat., July14.
As we did last year, each member does some sort of surface design on fabric, cuts it into 9" square swatches, and exchanges them with other members of the group. The only caveat is that we use the same color palette as this year's SOSQ poster by Kathy Deggendorfer.
This year's poster by Kathy Deggendorfer.
Here are the fabric swatches we exchanged at our Feb. meeting:
2012 Fabric Swatches
If you counted them, you came up with 12, but presently there are only 9 members in Fiberexplorations. The explanation:  some of us got carried away and and created more than one surface-designed fabric, so extra swatches were cut and exchanged.    Here's another view:
An enticing array of color!
It's exciting to see how much our members have progressed!  I compared this new set of swatches with last year's, and everyone was much freer in experimenting and trying new surface design techniques.  This year we see plenty of hand-dyeing, but also the use of DeColourant, shibori, resist work, and even marbling.
Now the real challenge begins -- to design and construct an original quilt using at least some of each of these 12 fabrics, plus others.  Per the SOSQ's requirements, the quilt needs to be at least 36" x 36" and needs to be completed by the end of June.
This year I hope to post photos and notes on most of our members' quilts as they're being constructed.  Unlike other groups, we don't keep our work a secret and then have a big reveal at the end.  Instead, we share our progress along the way.  And if any member requests it, we offer suggestions and advice along the way.  I'm anticipating great results!

Friday, March 9, 2012

Salem OR Guerilla Art Project

Since I have lots of new photos, that must mean I have some catching up to do on this blog!  I'll start with this: Guerilla Art.

Along with other members of the Salem Art Group (another group I'm in), I've been leaving pieces of guerilla art around town.  For anyone unfamiliar with that term, here's how wikidot explains it:

Guerilla art, also referred to as "street art", is a method of art making where the artist leaves anonymous art pieces in public places. It is often an installation in an unauthorized location. It is a way for an artist to express their views and opinions to a large audience in an anonymous way. In contrast to popular belief, guerilla art does not have to be done with spray paint.  There is no one motivation for making guerilla art. However, popular reasons include statement making, the sharing of ideas, the desire to send out good karma, just for fun, or to make a political statement.  (My reasons are those that are underlined.)

Here are the cards I made.  I carry them with me and leave in various places around town for people to find.  Actually, that's what I plan to do.  So far, I left one for a friend  who owns an art store (as a belated birthday greeting).  I'm having a hard time parting with the others.  So silly.  What good do they do me bundled in a baggie in my purse?  They're to spread out in the world and send good karma.

 
Collaged cards


These cards began as pieces of dyed cheesecloth, bits of ribbons, printed and handmade papers, bleeding tissue papers, transparent fabrics, stamped fabric, etc. sandwiched between layers of very fine MistyFuse, then ironed to fuse together, as below:
Fused collage


The final step was to cut the collage into 6 rectangles; each was fused onto a piece of watercolor paper and finished with a little hand-stitching in gold metallic thread. Glass beads were added to a few of the cards.

 Tomorrow I will leave some of these around town.

Wednesday, February 8, 2012

The Arty Chair

When I saw this chair on the Stitchin' Post's blog, I knew I'd have to share it.  In her "intuitive quilting" style, shop owner/educator/author/designer Jean Wells gave this chair a very fresh update that says Spring to me:
Jean's new chair.
Visit  the Stitchin' Post's blog to read about this project and see the in-progress photos.  I admire this kind of outside-the-box thinking..  What other unexpected ways could you use strip-piecing to to create a more inspired living space?  (I have lots of left-over pieced sections from my wall quilt Natural Symphony, but where to use them??)

Since I'm on the subject of colorful and interesting furnishings, here's the couch I'd love to have:
My dream loveseat.
I labeled the photo Hampton 2 Patchwork Sofa, but didn't save the source.  Guess I'll have to dream about making it myself.


Monday, January 23, 2012

Fabrications Show -- More Excitement!

There was even more exciting news after I learned that my quilt, Natural Symphony, was juried into the Bend (OR) show, Fabrications - The Art of Quilting:  they wanted to use images of my quilt in both the poster and the bookmark publicizing the show!   Today I received an email showing both of them:
Poster for the Fabrications show.

       
Even a bookmark!


It makes me very happy to see my quilt used to publicize this show!  The artists' reception is on Fri., Feb. 3, and I hope people aren't tired of seeing my quilt by then.  Here's what else I'm hoping:
  • there are no more avalanches on the pass or flooded roads preventing folks from getting to the reception 
  • no wild monkeys or crazed cougars attack our car on the way
  • bears don't come out of hibernation, wander through Bend, and block access to the gallery
  • my family and friends can celebrate at the reception with me!

Thursday, January 5, 2012

"Accepted into the show . . ."

There's a new phrase that I'm beginning to love.  It begins "Congratulations!  Your quilt has been accepted into our juried show . . ."


My quilt, "Natural Symphony."
I received notification this afternoon that my quilt, Natural Symphony, was accepted into a new show in Bend, OR called Fabrications -- The Art of Quilting.  But that's not all the exciting news.  Fellow Fabrications members Torrie Gordon and Deb Sorem also heard that lovely phrase today, and they each have a quilt juried into this show:
Torrie's lively, contemporary  quilt, "Water 2," juried into the FABRICATIONS show.
 Deb's exquisitely pieced quilt, "Bolero," juried into the FABRICATIONS show.

Obviously, all three of us are thrilled and practically dancing on clouds as we await the upcoming artists' reception on Feb. 3.  This is a new show and is sponsored by Sisters Outdoor Quilt Show, which has made Central Oregon a mecca for quilt enthusiasts with their annual summer quilt show (always on the 2nd Sat. in July), where over 1300 quilts are hung throughout this 1800's style town for one day. 

There are many, many talented quilters in Central Oregon.  Submissions for the Fabrications show numbered over 100, but the venue has space for only 30 quilts.  That's a humbling thought.  Having our quilts selected for this show is an honor, and in our excitement, we haven't lost sight of that.

Tuesday, January 3, 2012

Fiberexplorations' First Group Exhibit

The Fiberexplorations group is exhibiting the results of their Architecture Challenge at the Ladd & Bush branch of U.S. Bank in downtown Salem, OR through Jan. 30, 2012.  These small art quilts, ranging in size from 11" x 17" to 14" x 20", are based on the architecture of the Ladd & Bush Building, an historic Salem landmark constructed in 1868.
The "Architecture Challenge" quilt exhibit inside  the Ladd & Bush Building.
The quilts are made by [left to right, above]: Lisa Encabo, Erika Close, Joanna Price, Torrie Gordon, Chris Deibel, [the center info panel] Maureen Erhardt, Kathleen Nesvik, and Deb Sorem (shown are her two quilts for this challenge, both featuring an arch).
Center panel showing photos of the building's architectural features (flanked by Chris' quilt on the left, and Maureen's on the right).
The members who participated in this challenge photographed those exterior architectural elements of this building that each found most visually interesting.  The challenge was to then design and construct a small art quilt based on those elements.  While the resulting quilts are very different from each other, they're all the same in one respect:  each is a unique interpretation of its maker.  However, if  you look closely, you might discover the same design inspiration that was used by three of our members!

If you live nearby, the bank welcomes you to visit and see these quilts in person.  The quilts are nicely spaced so they're not crowded together, but that made it challenging to get a good photo that included all the quilts. So here I've broken the exhibit into two smaller, viewable sets:
Quilts by Lisa, Erika, Joanna, Torrie, and Chris.
Quilts by Maureen, Kathleen, and two by Deb.
Thanks to Deb for all the work she did to coordinate this exhibit (including the center panel and photos!).

The Ladd & Bush Building (U.S. Bank) is located in downtown Salem at 360 Commercial St. SE, at the corner of Commercial and State Streets.

This exhibit is dedicated to the memory of Joan Wynn, our tenth member.

Monday, January 2, 2012

Joy of Surface Design

I recently watched my new DVD from Quilting Arts, DIY Surface Design: Printmaking Made Easy with Everyday Objects with Leslie Tucker Jenison.  I loved it!  I especially enjoyed the sections on screenprinting with thickened dyes, gelatin monoprinting, and soy wax resist.  These are techniques I already use; what was unique about Leslie's approach was her use of everyday and found objects.

A great DVD!
I pulled out some of my vintage kitchen utensils with red wooden handle(1930's?) .  I hesitated just for a moment, but realized that getting soy wax on the metal parts wouldn't damage them.  In fact, maybe it will prevent further rusting!  (Note:  Any tools used in surface design should be dedicated to that purpose and never used again for food preparation or eating.  Same goes for this electric skillet -- it's dedicated to melting wax for batik and for encaustic work.)
My vintage kitchen tools for soy wax batik!
I love using soy wax for batik!  It has a very light, pleasant smell, but doesn't give off any harmful fumes so there's no need to ventilate.  It also has a lower melting point than traditional batik wax, so it melts quickly.  The biggest plus, though, is that it's easy to remove when the next step (dyeing the fabric) is completed.
Wax applied to cotton cloth using potato masher.
I stamped several pieces of cotton with wax designs, and my final piece was my favorite.  It was randomly stamped with the bottom tines of the large fork:
Soy wax applied with this large vintage fork.
My other accomplishment was finishing the painting on my glue-resist piece.  I'll let the paint cure another day or so before I wash out the glue.  I'm excited to see the final result!
Painting finished on my blue glue gel resist project.
Spending time on surface design projects is very satisfying to me, almost equal to the sense of abundance I get from using my own surface-designed fabrics in a project.  There's still more to do: deciding what color to dye my soy wax-stamped fabric.

Sunday, January 1, 2012

How to start off a new year

Last week I decided to whip up some quick and easy coffee sleeves.  The top and bottom ones were for a friend who, like me, loves these colors.
Three in-progress coffee sleeves.
I got as far as finishing the upper and lower edges of the bottom one, then proceeded to measure it to fit a typical paper coffee cup, when
"Oh no," I cried, as I gave birth to an alien in a snake-filled tree!  
Upside down.
(Oops, sorry!  That old saying just popped up from the recessses of my memory bank.   It's a made-up amalgamation of an imaginary Enquirer-type "news" article some friends and I made up back in the day.)  Hmmm . . . where was I?
Oh, right.  I'd designed my three coffee sleeves upside-down!  I can't think of any way to salvage them, so I'll just start over. That's a good way to start the new year:  jumping in and reworking a design idea that didn't succeed the first time.   Any ideas on how I can use the rejects in another project?


Saturday, December 31, 2011

Monoprinting with the GELLI Plate

I've been experimenting with gelatin monoprinting for a couple of years, and posted about it in 2010.  Since I also teach that class locally, I was curious when the new GELLI printing plate came onto the market last spring.  At first, I was adamant about sticking to my "homemade" method and not caving in to the idea of needing to buy the latest and greatest gadget. That was until I went to class with only enough prepared gelatin for my expected class of  7 . . . that had increased to 9 students.
I bought it!  It works!
I've reconsidered, and now the class supply list includes a GELLI printing plate for each student!  The benefits:  I no longer have to mix up three large pans of gelatin the night before class. No more spilled and hardened gelatin in my refrigerator.  There's no waste, since this new product lasts indefinitely.  Each student brings their own printing plate to class.  And it answers the question once posed to me by a very strict vegan:  What's the alternative to using Knox gelatin, which contains animal products?   The GELLI plate!

However, I've noticed one interesting phenomenon when printing on fabric with this new surface.  I was using acrylic paint, so I mixed textile medium with it.  When I rolled that onto the plate with my brayer, the paint mixture immediately began to separate, resulting in this background texture:
My first GELLI print on fabric, with snow? leaves?
A second attempt with straight acrylic paint gave me a solid-covered background.  So the textile medium does a little random dance on the GELLI surface, which is pretty cool!
I might (no, I WILL) miss the cracks and gouges that come with using real gelatin.  They produced some interesting, organic lines on the printed fabric.  And I'll miss the cool feeling of the sheets of gelatin in my hands.  Yes, I liked that!
Painted GELATIN plate with an interesting crack.
And now we're here at the end of 2011.  I feel pretty good about this year's theme word, FOCUS.  I got better at it.  The theme for 2012 is MAINTAIN MOMENTUM.  How about yours?   Please leave a comment and share your mantra (if you have one) for the new year.  Thanks for following along with me, and I'll see you next year!


Friday, December 30, 2011

More Holiday Fabric Postcards

The winner of my first blog post was nandas (Nancy of Portland, OR) and the prize was one of my fabric postcards.  Now that she's probably received it, I can show it here.   I love the quaint message it sends:

The winner of my first blog contest received this fabric postcard.
I have a collection of vintage postcards that I often use (in part or whole) when designing fabric postcards.  This year I added tiny accents of glitter paint, and I like the added sparkle.  Here's another:

Another fabric postcard enhanced with glitter paint.

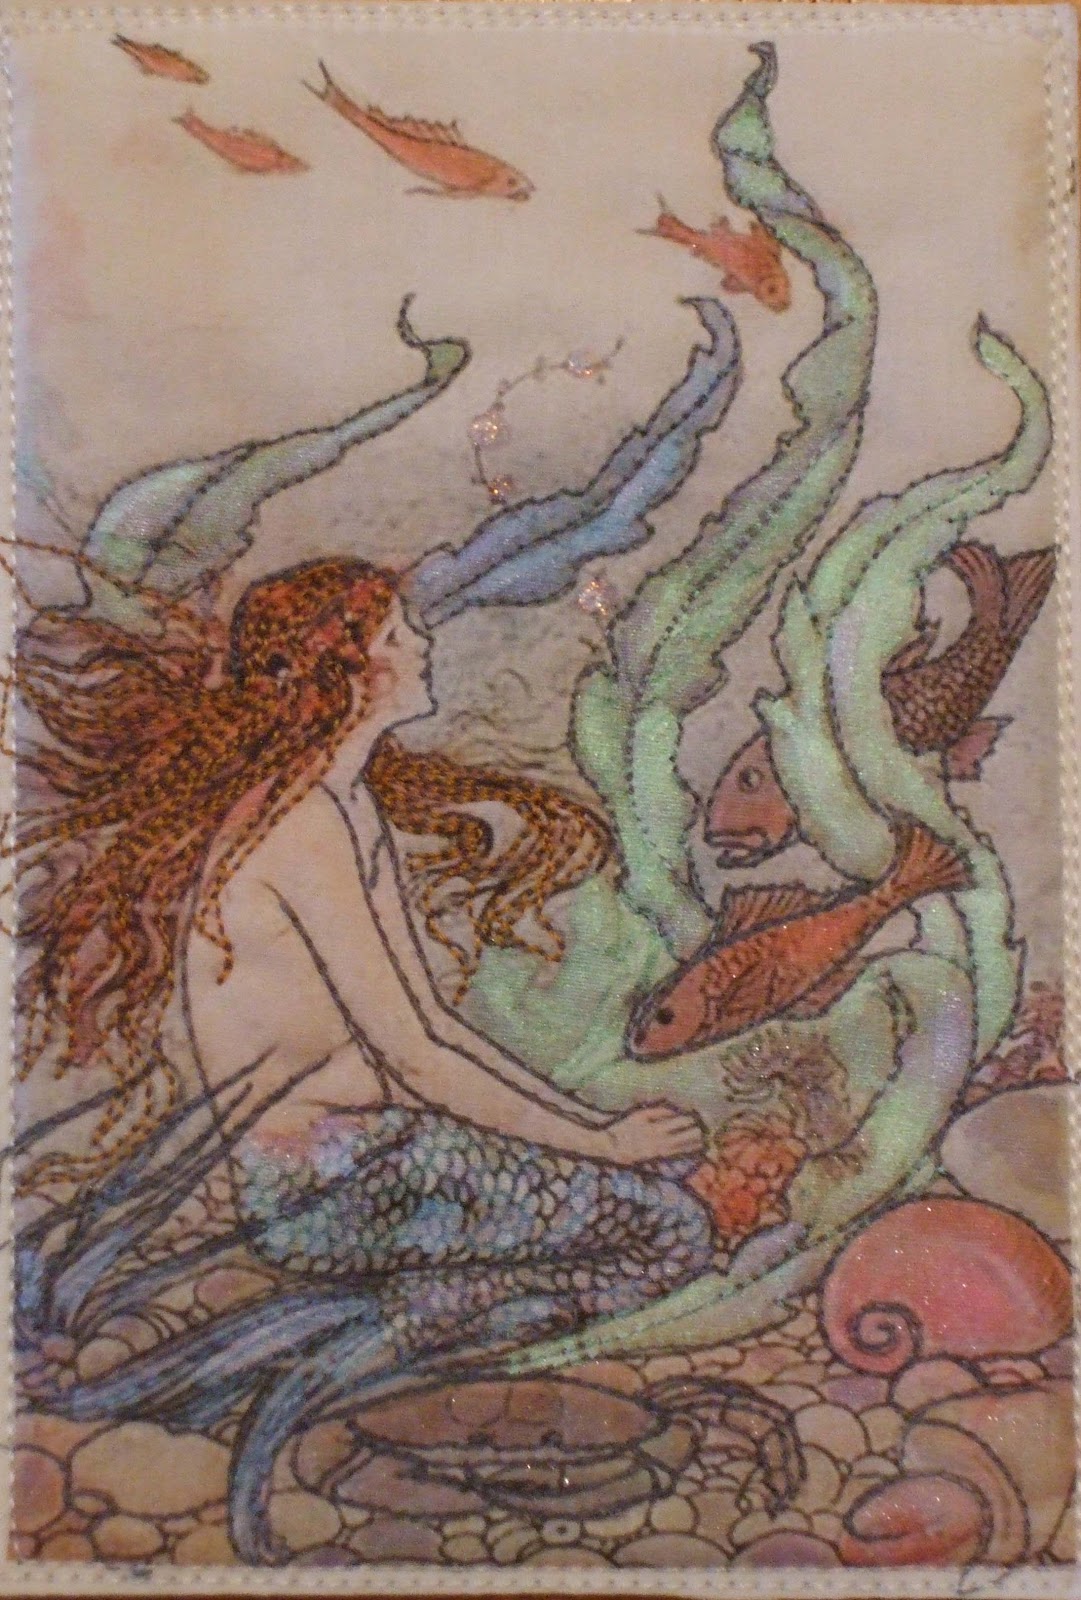
The next one is very special.  I made it for my son's girlfriend, Brandi, knowing that she loves mermaids.  (So do I, which is why I 'd previously downloaded this vintage postcard!)  I quilted the outlines of the major features with cotton thread, then switched to a copper-colored rayon for the hair, which added a nice texture.  The original colors of the postcard were very light and ethereal, so I added some tints of color using LuminArte's Primary Pigments (ground colors mixed with pure mica pigments) for a bit more intensity:
Brandi's Dream.


It's hard for me to admit this:  I grow very attached to these little beauties, so much that it's difficult to send them out into the world.  But my other friend Nancy wisely advised me to release them for others to enjoy!  No one else can enjoy them if you keep them all for yourself.  She's so right.  Anyway, I can always revisit my photos of them.

Sunday, December 18, 2011

Holiday Postcards Exchanged (fabric, of course!)

 Here are the fabric postcards made by members of Fiberexplorations for our 2011 holiday postcard exchange:

Fiberexplorations' 2011 fabric postcards.
As we've done the previous two years, everyone brought a potluck dish and we sat down for a lively dinner and conversation.  Erica, our resident wine expert, treated us to Prosecco, an Italian sparkling wine, which was wonderful.  After dinner, we drew names to see whose card we would receive.  (Until that time, none of us knew who would receive our card, or whose card we'd receive.)   In the following photo, we're each  holding the postcard we've received:

Holding the postcards we've received.
And another photo to document the makers of each postcard:
Holding the postcards we made for the exchange.
 In my next post, I'll include photos of all the Architecture Challenge quilts.

Sunday, December 11, 2011

Winner of first blog contest!

Vintage Christmas postcard.


The winner of my first blog contest (fairly chosen by the Random Number Generator) is Nancy D-D from Portland, or "nandas."  Congratuations, Nancy!  I'll get your holiday-themed fabric postcard in the mail this week.*   Please contact me via email with your address.  And thanks to all who entered!  Please stay tuned for future contests.  This was so much fun that I'm going to dream up some ideas for more contests, either monthly or bimonthly.
(*I'm not posting a picture of it until you've had time to receive it in the mail.  I wouldn't want to spoil your surprise!)
Tomorrow night is Fiberexplorations' holiday dinner meeting.  We'll draw names and exchange the fabric postcards we've each made.   I hope to have good lighting so I can photograph each one and show them in my next post.  Keep watching!

Wednesday, December 7, 2011

Blog contest deadline extended; more on Fabric Postcards!

FYI:  The contest announced here on Nov. 29  has been extended until tomorrow (Thurs., Dec. 8) at midnight.  The prize is one of my fabric postcards!  Follow this link to enter.
The first fabric postcard I ever made, and still one of my favorites, this reindeer (a Laurel Burch fabric) was simply freemotion quilted with satin-stitched edges:

Joanna Price's holiday reindeer, 2005.
Blogger is now cooperating, so I can add more info to my previous post about fabric postcards.  Shown below are the 4 layers:  the top (or "base fabric"), cotton batting, Timtex, and the back (several examples shown, stamped with "Postcard").
The 4 layers of a fabric postcard.
Besides the examples above, here are the backs of three different fabric postcards (clockwise, the handwritten example is mine, followed by postcards made by Lisa Encabo and Chris Deibel):
The backs of 3 finished fabric postcards. Always sign and date them!
 Next, the postcards I've received from past holiday exchanges within Fiberexplorations:
Hand-appliqued, hand-beaded by Chris Deibel, 2009.

Always one for a Hawaiian theme, this was from Lisa Encabo in 2010.
Time to start stitching some more!

It's Fabric Postcard Time Again!

Making fabric postcards!
It feels like Santa's taken up residence on my kitchen table!  I needed this large surface to spread out the bits and pieces I use for making fabric postcards.  A few were finished (or at least nearly so) last year, and many more are somewhere in-progress. 
Next Monday is Fiberexplorations' third annual holiday dinner/meeting, hosted this year by Deb.  We all bring a potluck dish and a fabric postcard, then draw names and exchange the cards.  It's always a treat to receive a piece of art made by another member of the group.  I'm trying to upload the cards I've received from the past two dinners (from Chris in 2009; from Lisa in 2010), but blogger isn't cooperating at the moment!
Instead, I'll show you how I assemble my 4-layered fabric postcards.   The top layer (or "base fabric") is usually pieced or includes some fusible applique, such as the two examples below.  Strips of green fabrics were randomly stitched together, backed with fusible web, then cut into tree shapes.  Then they're fused to the base fabric.  A layer of cotton batting goes under this base fabric, and those layers are quilted.   NOTE:  I use either fusible web or a fusible spray baste to hold the layers together during construction.

Strip-pieced trees fused to base fabrics (batting layer visible underneath).
Sometimes I go to my vintage postcard collection, and photocopy some of them onto pre-treated fabric sheets for ink-jet printers.  Fusible web is added to the back of the photocopies, then sections are cut out and fused to the base fabric.  Other fabrics (with fusible web already attached), are fussy-cut and added to the design:
Vintage postcards trimmed and fused to base fabrics (batting layer visible underneath).
Sometimes (after the quilting is done),  I pull out my box of ribbons and begin adding some surface embellishment.  Angelina fibers, tiny seed beads, glitter glue, and fairy dust are all great additions!  Just be sure nothing dangles or protrudes from the postcard, or you might not be able to mail it.
Ribbons and other sparkles!
The finished size of my postcards is 4" x 6".  I used to start off by cutting my base fabric that size, but this year I'm cutting it and the batting  4.5" x 6.5" so there's room to trim after quilting.  Yes, these can go through the US Mail;  just take them into the post office and ask that they hand-cancel the stamp (rather than putting your fabric postcard through a machine).  Fabric postcards can be mailed at regular letter rates (not postcard rates).

Tuesday, November 29, 2011

Work by Kathleen and Deb; First blog contest!

Here's a peek at some of the other projects our members are working on:

Kathleen's deconstructed/reconstructed/eco/repurposed/all-purpose bag got plenty of oohs and ahhs, and it's even lined!
Kathleen's bag
While Kathleen was thinking winter (note the snow in the bird scene at the bag's bottom), Deb was still in the moment with autumn leaves:  Do you see how that relates to yesterday's post?  (Clue:  see the photo caption on my Nov. 28 post!)
Deb's "Autumn Leaves"
Let's make that into a little contest, shall we?  It will be my first!  At midnight Thurs., Dec. 8,  I'll randomly draw a name from all who leave a comment with the correct answer to the above question.  To the winner:  one of my lovingly handmade fabric postcards.  Please be sure your email address is accessible from your comment so I can snail-mail your fabric postcard.

Monday, November 28, 2011

Deb's pet portrait in Quilting Arts magazine!

We knew Deb's quilt was special when we revealed our pet portraits last December for the Feeling Petty Quilting Arts 2012 Calendar Challenge.

"In the Moment" by Deb Sorem
 The latest issue of Quilting Arts (Dec. 2011/Jan. 2012) features Deb's colorful quilt as one of six Judges' Choice winners.  Who could resist this happy fellow?  As Deb explained, "One way to reduce stress is to live in the moment, rather than fret about the past or future.  No one does this better than my happy, loveable golden retriever."
Congratulations, Deb!


Wednesday, November 16, 2011

Architecture Challenge Reveal

I've had formatting problems with this post -- just ignore the weird spacing, etc.!
The Fiberexplorations group met on Monday night to reveal our quilts for the Architecture Challenge.  Most of us still have a bit more work to do before these pieces are completely finished.
Here they are, beginning with Deb's pieces.  Yes, she made two, both featuring arches, which are key elements in architecture (and highly visible on the Ladd and Bush building).   Each quilt holds special, personal meaning to her, not evident to other viewers.
Deb's TWO (!!) pieces, featuring arches
The piece that Chris is constructing was quite unique-- it's wool applique and done by hand:

Wool applique by Chris
She found her inspiration in the center motif of the following architectural element:
Scrollwork freize (?)
Joanna's untitled (and unfinished) purple piece


Torrie and Maureen used the fluted freize as their design inspiration, as did I in my first (unsuccessful) attempt. At least I think that's what this exterior architectural element is called:


Fluted freize (?)
Note the embroidered ribbon Torrie used, along with the faux trapunto she created along the top and bottom:
Torrie's piece, titled "Prism"
Maureen was celebrating her birthday with her family, so we didn't see her that night or get a photo of her piece.   I'll add that soon, as well as a pic of Kathleen's quilt.
Nov. 28 update:   A clearer photo of  Lisa's quilt is below.  It features men's shirting fabrics and zippers, in a Courthouse Square block arrangement.  Coins coated with resin embellish this piece, which brings to mind a gentleman banker in his Brooks Brothers suit, button-down shirt, tie, and well-shined shoes. (Personally, the zippers made me think of two other bank-related items:  a safe-deposit box and a bank vault, both of which are "zipped up" tightly for security and hold coins!)
Lisa's "zipper quilt"
Another update to this post:  I don't have a title for my purple architecture quilt yet, but today a possibility came to mind:  Architexture!  Whaddya think?